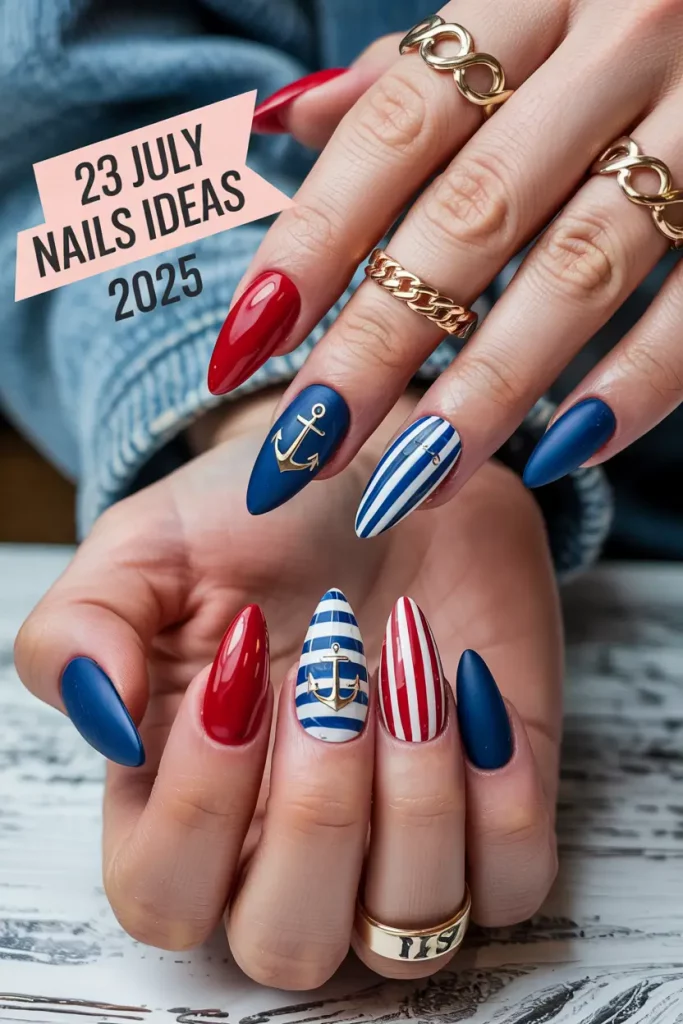
Save Pin
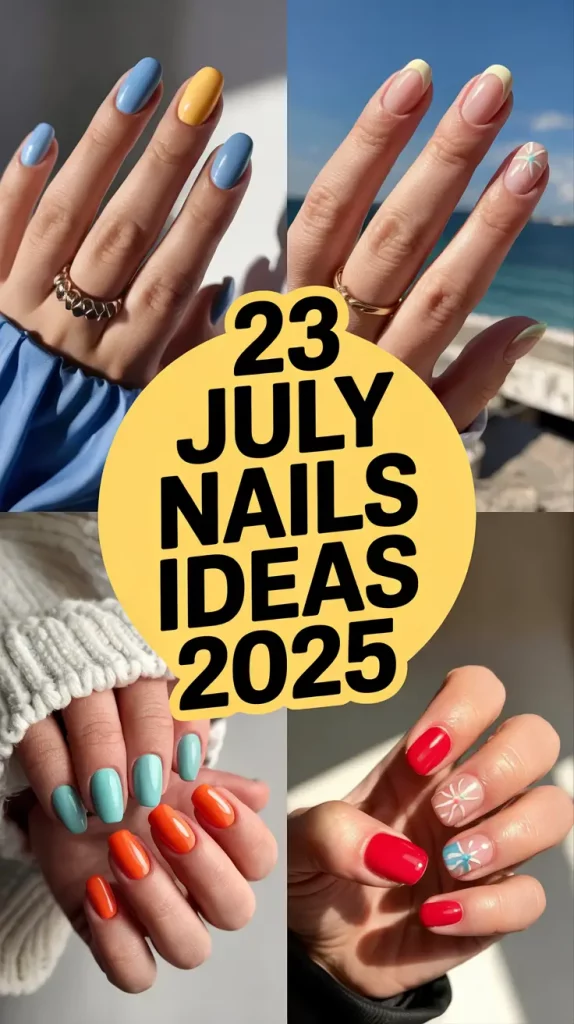
Is there any better reason to change your nails than July? Between Fourth of July barbecues, mid-summer birthdays, rooftop cocktails, and spontaneous getaways, it’s the one month where bold and breezy styles actually make sense. And with the right set of nails? You don’t just go to the party — you look like the invitation says you should.
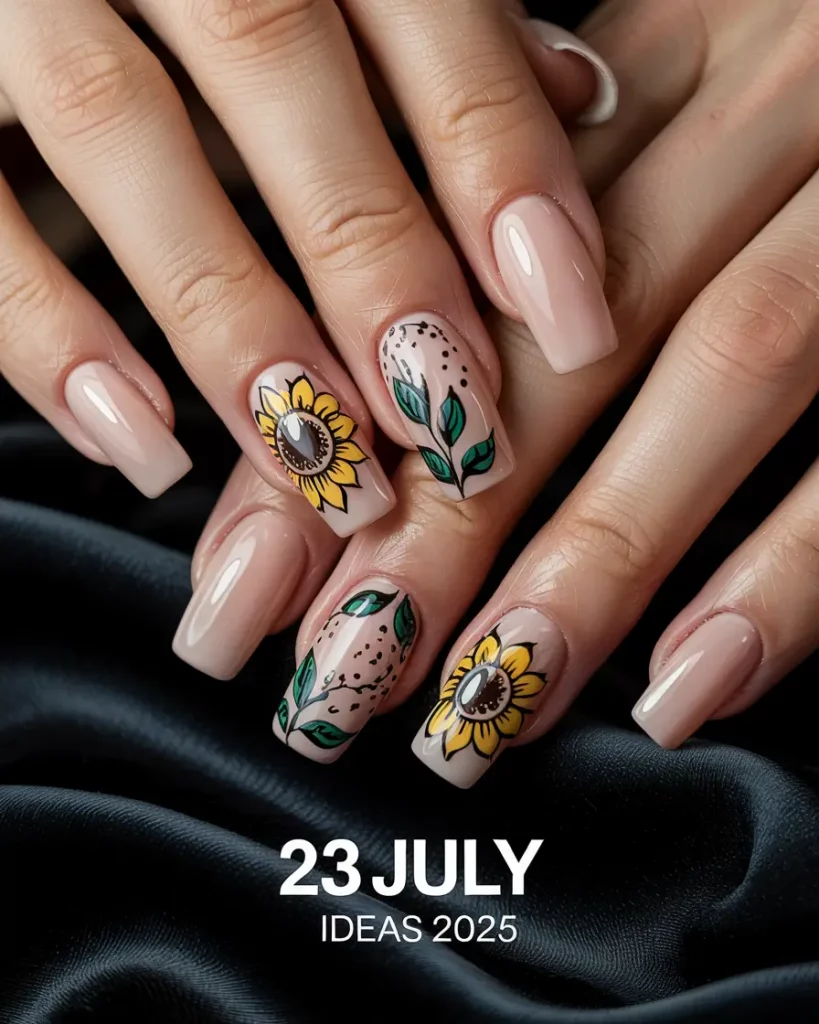
If you’ve spent time searching for july nails ideas 2025 on Pinterest or Reels, this post is your own inspiration board. We’re including everything from soft fourth styles with just a hint of red-white-and-blue to bold, Western 4th styles, citrus-inspired looks and French tip designs that are cooler than the other side of the pillow. Each idea is a full look — a moment. And honestly? You don’t need to be a nail tech or spend much time to do these looks. You can do most of these crafts at home, even if your dominant hand isn’t very steady.
We’ll look at the top nail looks of the season, one style at a time. Choose from easy fourth styles or full-on patriotic designs and you’ll find something here that will make your fingers move every time you grab your iced coffee.
Glossy Red Vibes with Patriotic Stripes
For this 4th of July, try these nails that combine a rich red with fun stripes, red white and blue and little flowers. I enjoy this design because it’s halfway between Classy 4th and Easy 4th. It’s not screaming fireworks, but it’s definitely in on the celebration — which makes it perfect for everything from a rooftop picnic to a quick Target run.
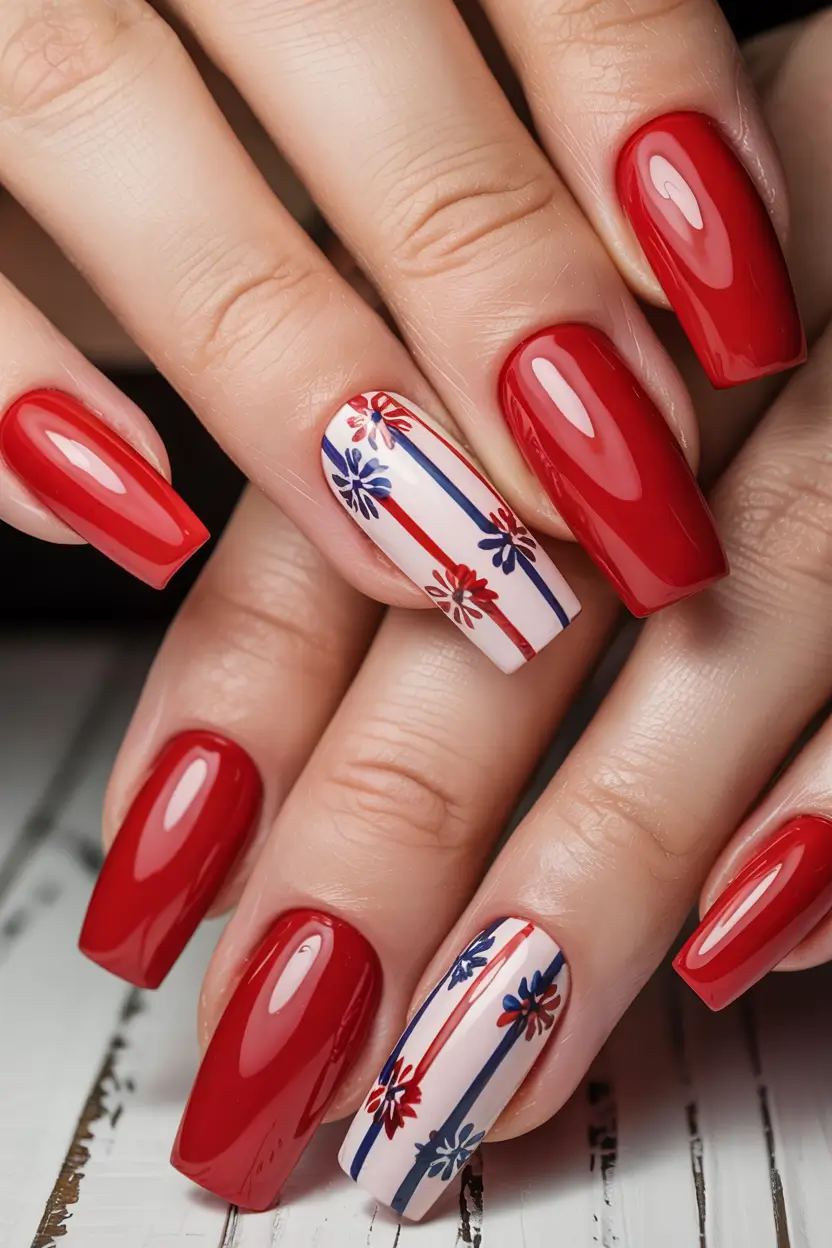
I’d recommend starting with OPI’s “Big Apple Red” gel polish for a really shiny look. For the accent nails, a creamy neutral like Essie “Ballet Slippers” works as the canvas, while thin nail art striping tape (in navy and crimson) plus a fine-tipped brush can help achieve those linear accents and petite blossoms. Since it’s about accuracy, make sure to take your time with those stripes.
I paint the nails red twice to begin and then use a light blush color on the ring and middle fingers. I use either nail art tape or a striping brush to draw vertical lines alternating between them. I use a dotting tool to make each flower with five petals, making the petals by dotting the page. After you’re done, add Seche Vite top coat to seal the nails and make them shine.
What’s special about this? It’s a bold red fourth design without being kitschy. I chose something similar for my road trip through the Southwest last year and all the gas station attendants loved it. Nail designs like this are little conversation starters.
Daisy Fields Meet Gold Leaf Magic
It’s hard to resist the dreamy feel of this look — soft pinky-nude nails, daisies and a hint of metallic foil. It’s a summer look that brings together simple, pretty touches and a hint of sparkle. If you’re looking for something a little more playful than patriotic, this could be your perfect fourth or Birthday set.
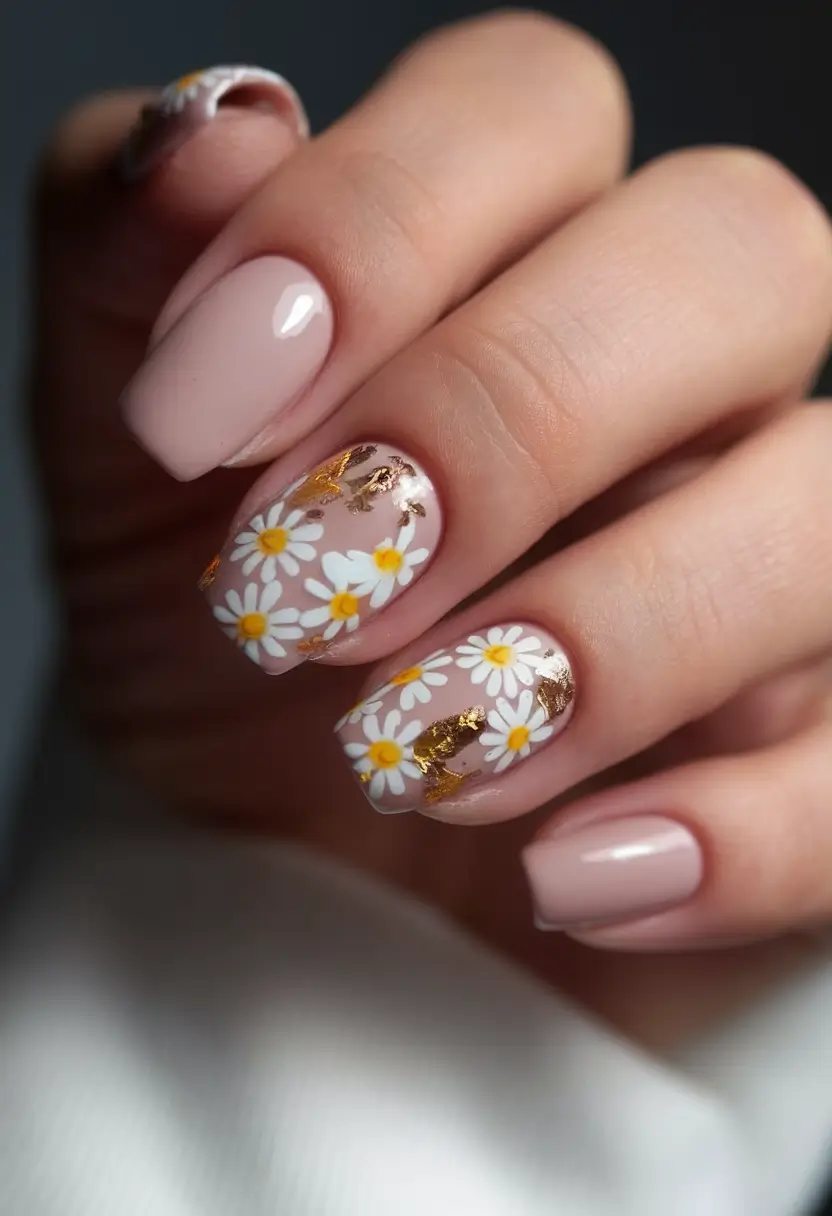
I’d apply “Bare My Soul” from the Infinite Shine line by OPI as the base for this manicure. The daisies can be achieved with nail stickers (yes, even pros use them!) or hand-painted using a tiny brush and acrylic paints. To get that luxurious effect, press the flakes of gold leaf foil into a still-sticky layer of top coat or gel polish.
I find that this look is best when you use only a little makeup. Place the daisies slightly asymmetrically to mimic nature. Gold leaf is best when it shines at random, just like the light coming through petals. A top coat will seal everything in nicely and you’re done. Literally.
I tried something similar last year at a lavender field in upstate New York and my nails looked better than the flowers. This style always feels feminine and delicate which makes it timeless.
Sunflower Charm with a Nude Base
Sunflowers in July? Groundbreaking — and still completely irresistible. I’m really enjoying the sunny feeling from this manicure and I love how the big flowers stand out against the background. It’s not your average summer nail — it’s a designs fourth upgrade for those who want brightness but with sophistication.
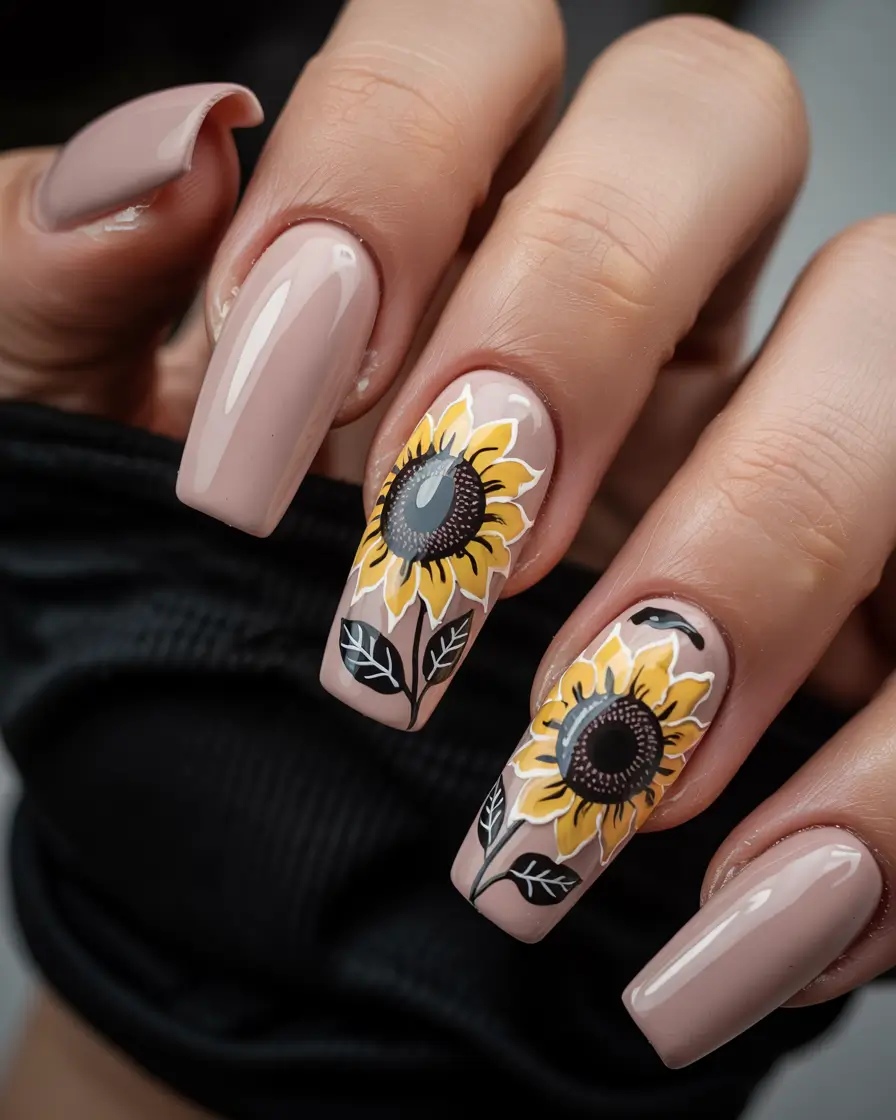
To create this, I’d recommend a taupe or nude-pink gel base (try “You’re Blushing” by Kiara Sky). The sunflower pattern can be made using mustard yellow, chocolate brown and black polish with a nail brush. For the center of the flower, use a dotting tool to give it that textured depth — a technique nail artist @nail_swag swears by for realism.
The trick to this look is placement. Don’t make the petals look perfect on the nail — let them bleed slightly toward the edges. This makes it look like you are up close to a sunflower as it blooms. A matte top coat will look great, though I find the glossy finish gives your nails a lovely summer shine.
Sunflowers make me think of slow walks through farmers’ markets and lemonades with too much ice. It’s nostalgic but not dated. It’s the kind of look that says July nails 2025, but with a storybook twist.
Turquoise Tips with Gold Accent
Now we are showing you how to do French tip in the year 2025. Replacing white with turquoise gives your space a poolside feel right away. Because of the scattered gold leaf, the place feels like a piece of jewelry, so it’s perfect for both daytime brunch and nighttime parties on the roof.
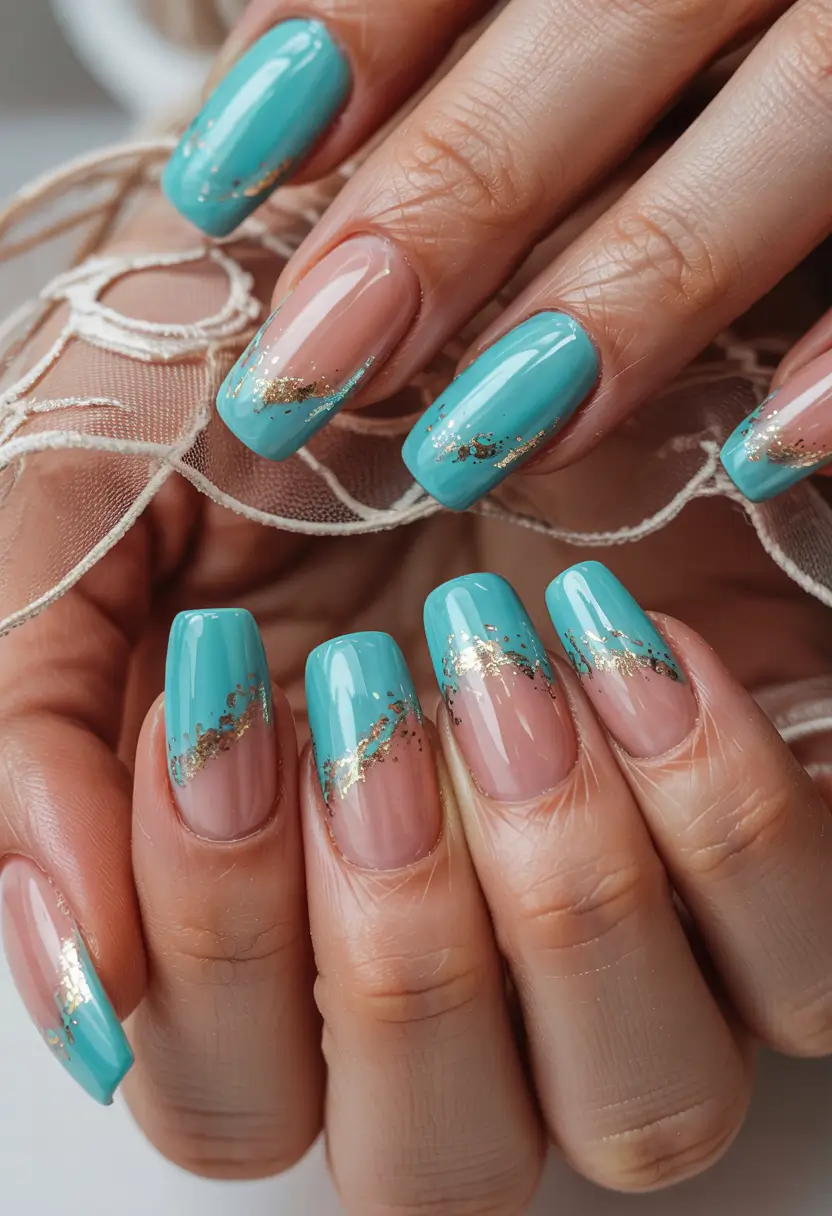
I often enjoy using “My Studio Blue” by DND with a neutral pink-beige color underneath. If you are skilled, you can draw the tip freehand; otherwise, use tape to mark it. Adding gold foil in a diagonal line gives the design that unique, editorial look. There’s a classy 4th this year, but we’re not seeing the usual stars and stripes.
I first tried a similar color story during a girls’ weekend in Miami and remember thinking, this is what mermaids would wear if they had salons. It’s that mix of elegance and playfulness that makes it an easy fourth winner.
Olive Green Meets Wild Leopard
Now, we’re moving into something more serious, yet still patriotic in its own way. This combination looks modern, city-like and a bit like the 4th of July, especially if you’re into strong neutrals. You’re getting safari, cocktail and Independence Day all at the same time.
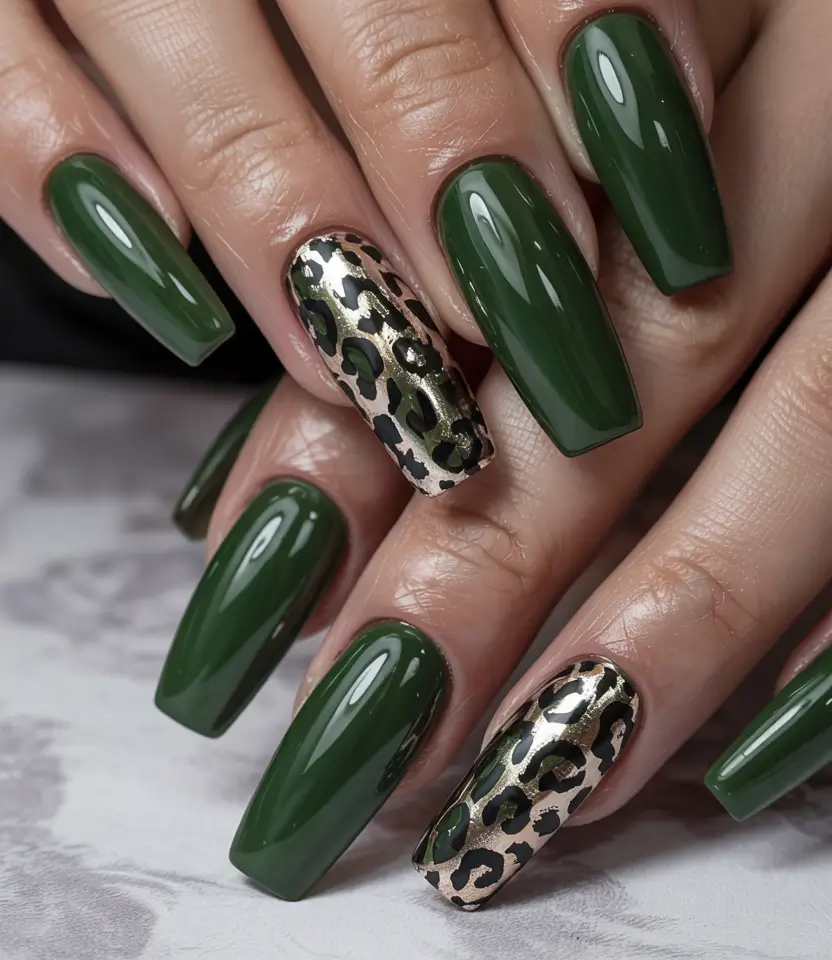
You’ll want a mossy green polish (Essie’s “Exposed” is a fave) paired with metallic gel foil for the animal print. Now, many nail kits have leopard templates or stickers which allow you to create the look yourself at home. I use a rubberized top coat to ensure the foiled parts aren’t chipped.
There’s something satisfyingly tough about this manicure. It’s not a standard 4 of July nail and that’s the whole idea. I think of this moment when someone is enjoying fireworks from their cabin deck or at a country concert outside.
Lemonade Stand Meets French Tip
Now you have the best of summer nail fun right here. The addition of lemon slices and glossy white French tips gives this set a garden feel that is still perfect for running errands or swimming. It’s a positive take on basic fourth energy—light, clean and definitely enjoyable. The difference between the yellow and green really stands out against the natural background.
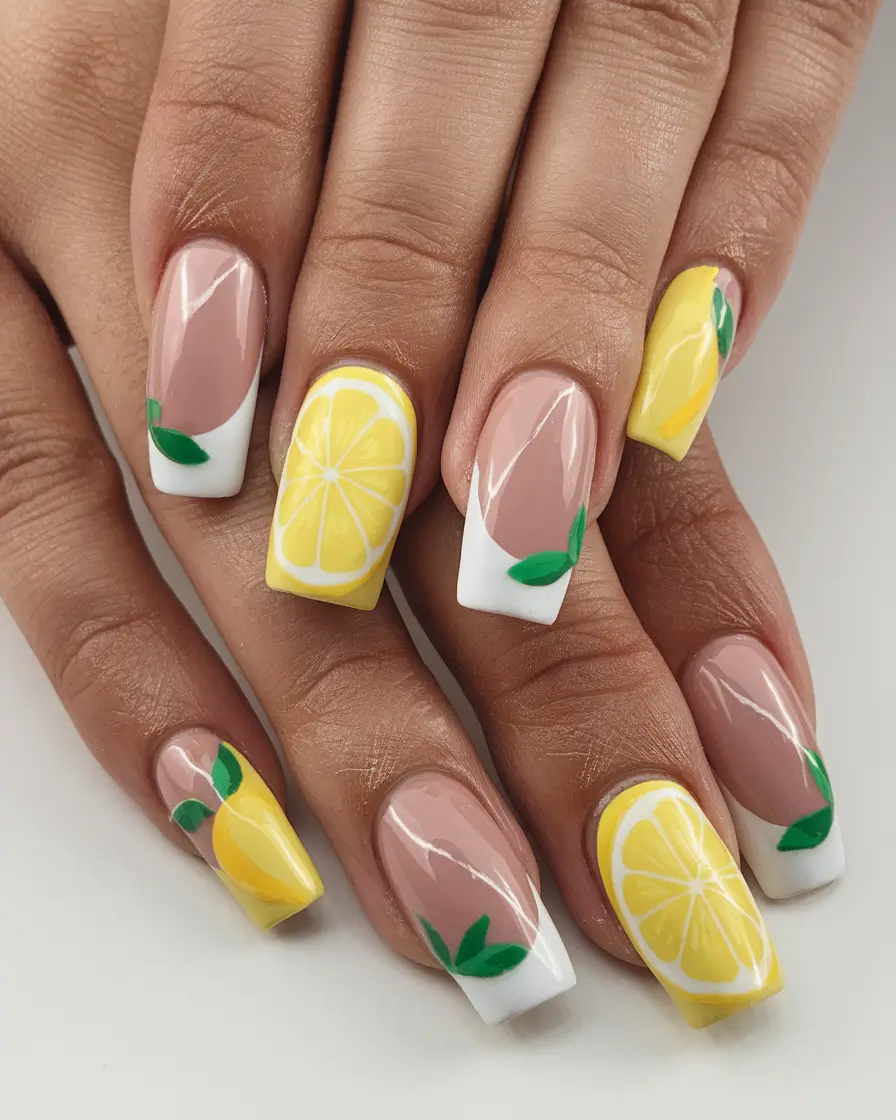
You’ll need a creamy nude or soft tan base (think “Tiramisu for Two” by OPI), a bright banana yellow (try “Daisy Know My Name?” by China Glaze), a true white polish, and a medium green for the leaf accents. To get the lemon segments and leaf shapes right, a fine detail brush is needed, but if you’re pressed for time, use lemon stickers.
Painting a clean first coat and allowing it to dry is the first thing you should do. After that, paint lemon half-moons with the yellow polish along the tips and use white polish for the lemon segments. To keep the drawing fun, draw the leaves off to the side. Finish with a high-gloss top coat. Tip from celeb nail artist Tom Bachik? “Don’t make your citrus art look too smooth—it helps the art look more natural.”
Lemon nails are a style I keep choosing every year in July. They seem bright and bring back memories, much like your first taste of lemonade. Bonus: they’re unexpectedly flattering on all skin tones.
Pink Ombré That Feels Like Cotton Candy
Soft pink gradients are always popular, but this one adds a little shimmer and depth that makes it perfect for July. It’s understated yet layered—a beautiful subtle 4th or short fourth idea if you’re going for polished, not punchy. It’s amazing to watch as these hues go from a light pink to a deeper cotton candy pink.
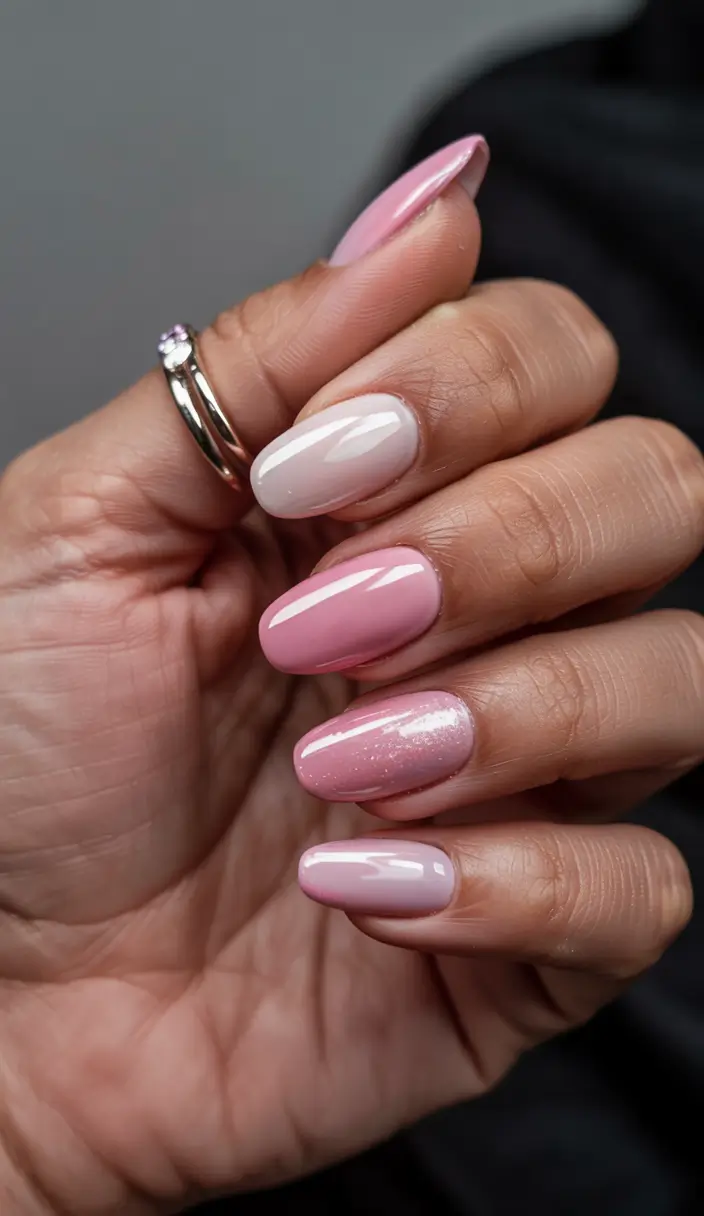
To recreate this, I recommend a set of pink polishes from pale to rich (Zoya’s “Dot” and “Joey” make a great gradient duo) and a makeup sponge for blending. You may also try shimmer top coats such as Essie’s “Sugar Daddy,” to add a gentle shimmer. Apply latex around your nails before painting so you won’t have to clean up as much during blending.
Lightly press the sponge down with polish, starting at the lightest shade and adding more polish in extra layers. Let each dry before applying the next. Ensure you add a glossy top coat to get a shiny look. According to nail tech Betina Goldstein, using very thin layers is the key to a clean ombré effect and it’s always worth the extra time.
I turn to this when I want a stylish look that isn’t too bold. I wore it to a baby shower for a friend and it looked great with my mauve wrap dress, so I’ve copied the look a few times since.
Minimalist French in Tangerine Pop
Basically, French tips are always classic, but adding an orange twist gives them that fresh, summer look we didn’t even know we wanted. If you’re looking for a light holiday style, this set is just right, as it is simple and elegant. It’s minimal, but far from basic.

You’ll need a neutral base (CND “Bare Chemise” works well) and a fiery orange polish like “Atomic Orange” by OPI. A striping brush or French guide stickers can help you make a straight line. Even though orange can seem daring, it’s actually very easy to wear, especially when your nails are short or almond-shaped.
After the base is on, lightly run the orange color across the tips with your guide. Curve each line along your nail shape so it fits without any bumps. Apply a top coat to everything and your furniture will look brand new.
This is my idea of “elevated casual.” When I wore this at my July backyard brunch, my cousin messaged me right after, asking for the color. It’s a design that suggests trendiness in a quiet way, not by shouting it.
Fireworks and Sparkle for a Full-On Fourth
If you’re leaning into Fourth of July festivities, this one brings the boom—literally. Red and blue starbursts on white nails, along with glittered navy and red white and blue flakes? It’s a celebration of patriotism and I’m all for every little thing. Think designs fourth with firecracker flair.
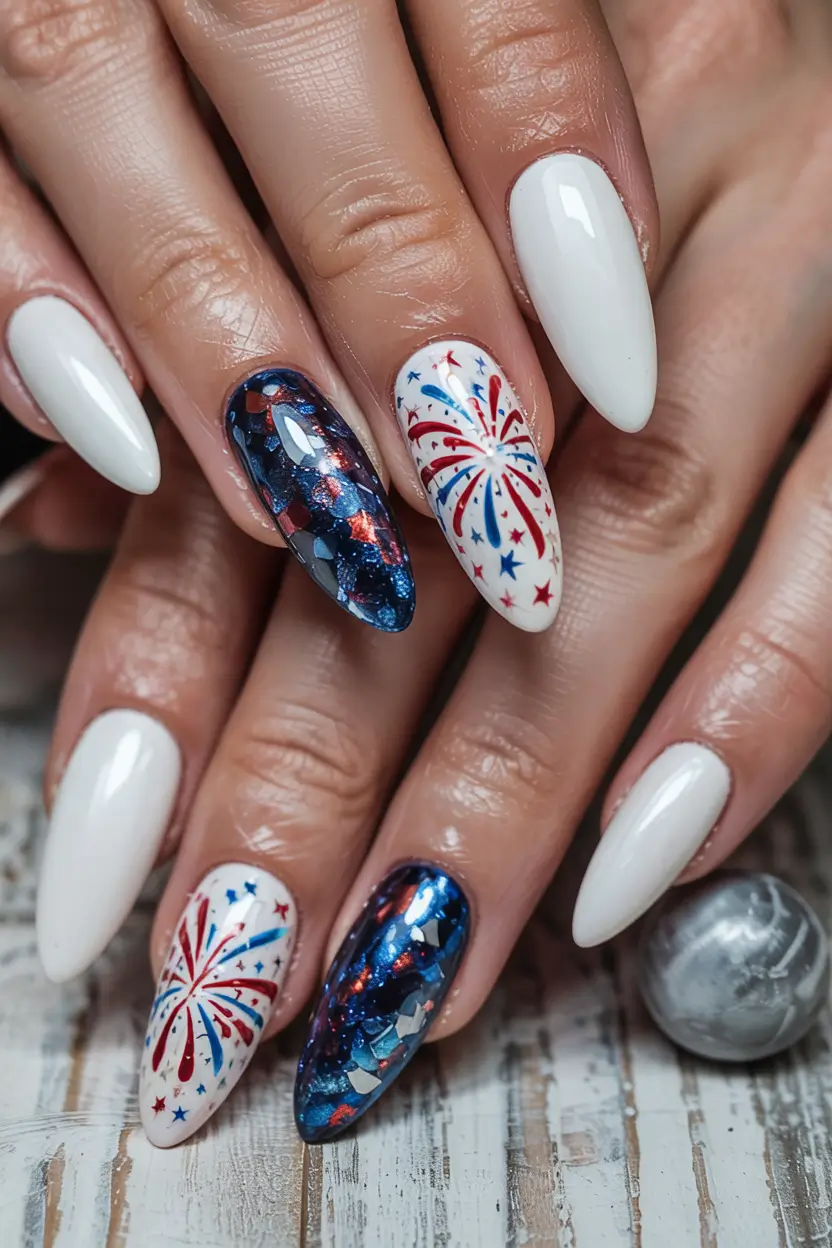
White gel polish forms the base (try “Alpine Snow” by OPI). When doing fireworks nails, you’ll need a nail art brush and some red/blue striping polish. You can make the navy glitter polish thick like ILNP’s “Party Favor,” and adding star-shaped confetti brings an actual sparkle. It’s important to use a base coat that will keep the sequins from falling off.
First, paint two layers of white, let it dry and then use careful flicks from the center to create your fireworks. It takes two layers of glitter and a little patience to get the glitter nails even. Apply two more top coat layers at the end to seal everything. If you’re in a hurry, nail artist Julie Kandalec suggests dipping your nails in cold water between each layer.
I wore this outfit on a lake weekend and it really lit up the night like fireworks. If you choose bold nails, make them really stand out—they’ll outshine any sparklers.
Neon Tropic with Wild Leaf Accents
Talk about tropical fever. The bright yellow on this mani is enough to catch anyone’s eye, but add the black-and-nude leaves and it’s even more impressive. Chef’s kiss. This look is fearless, it’s summer and it’s all about the Western 4th—especially if you’re wearing it at a festival or on a warm holiday.
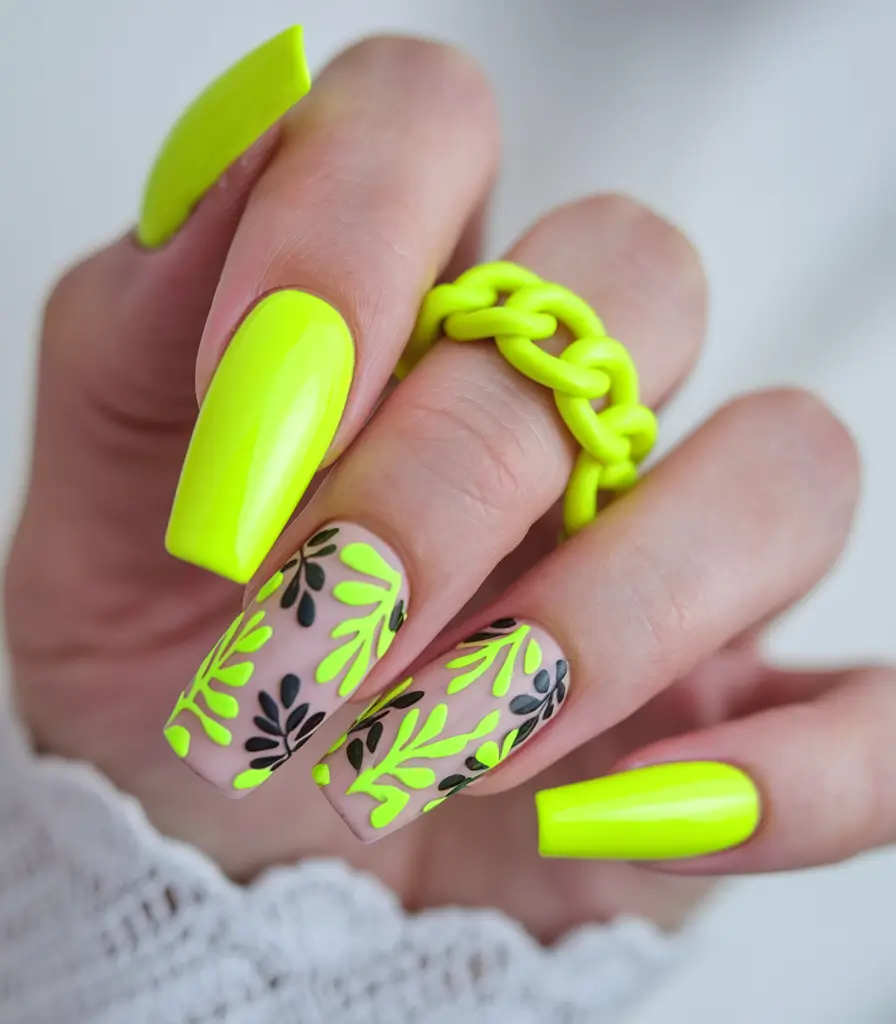
Samoan Sand by OPI is a good nude matte color to start with for the base. You can get neon yellow with the “Glowstick” nail polish from Orly. To make the leafy designs, use nail vinyls or stencils and then use a gel brush with black polish for the accents. The neon color looks brighter when it’s applied over matte top coat on the nails.
Directly apply the neon polish on your nails and follow it with the nude ones. Use the vinyls to print the leafy pattern—using black and yellow at different times gives the bold contrast you want. I find that a gel overlay gives me better staying power. The neon is much more vibrant when it’s exposed to sunlight.
This one’s a show-off, and I mean that lovingly. I wore this outfit at a salsa night on a rooftop in L.A. and people I didn’t know were always asking me where I had my nails done. If you’re feeling fearless, this is your green light.
Playful Positivity in Black and Yellow
It’s hard not to feel happy when your nails are bold and bright at the same time. Glossy black, cow print patterns and the smiley face make this look feel like a modern take on retro rave style. It’s cheeky, a little nostalgic, and still surprisingly wearable. The combination of high-shine black, white and yellow makes this outfit truly memorable for a 4th of July weekend or your own birthday.
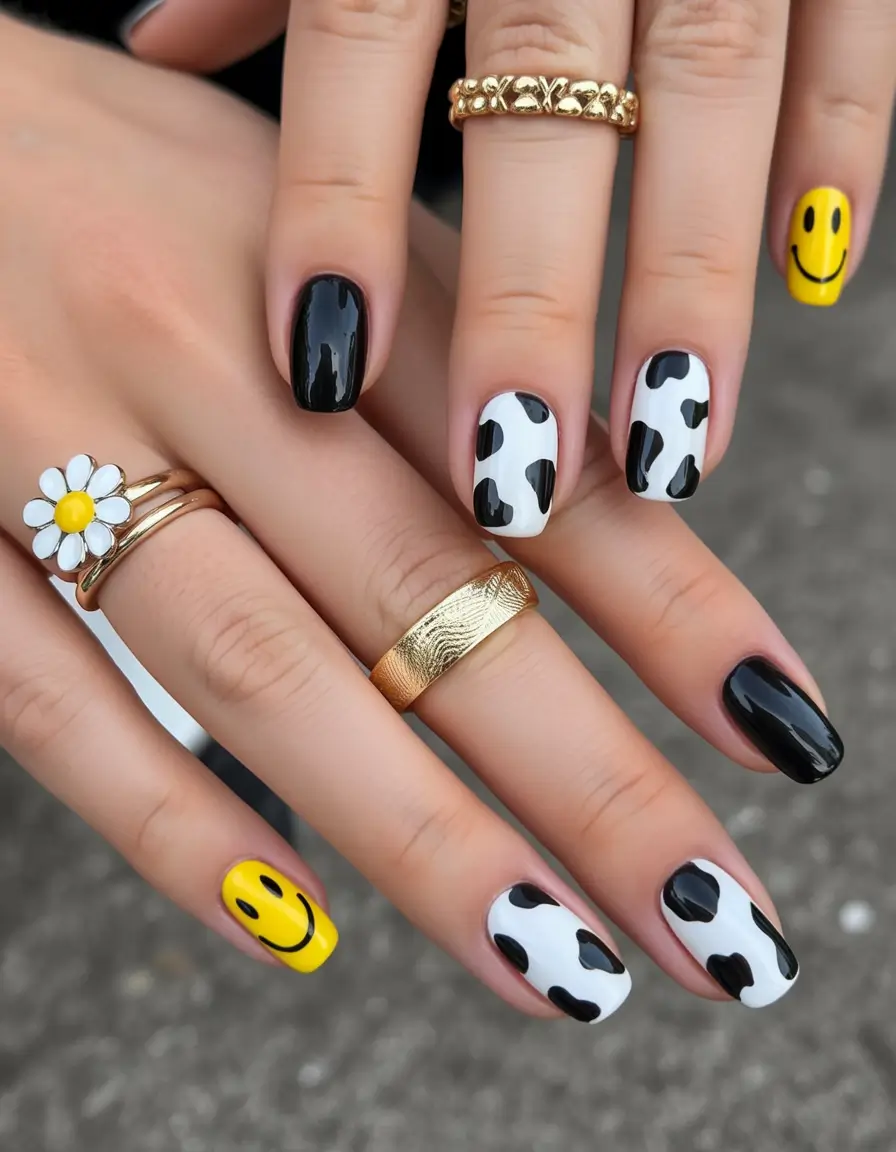
I suggest using a gel base to keep this look lasting and using OPI’s “Black Onyx” for the shiny black and “Sun, Sea and Sand in My Pants” for the bright yellow. Take a fine nail brush or dotting tool to place the cow splotches and a smiley face. The base of the cow nails should be done with a white gel called “Alpine Snow.”
You don’t have to be a nail technician to do this. Paint two layers of each color, curing after each one and then use a detailing brush to paint the accent art. Regularly polish your top coat to make your nails look like they’ve just come from the salon. If you feel a bit nervous about making smileys by hand, you’ll find that Etsy has many smiley nail stickers that make it effortless.
I chose this look for a friend’s summer engagement BBQ and it really got people talking all night. Seeing someone smile with their fingers just makes you smile, too.
Electric Lines and Neon Dream
The next mani is inspired by street style in the summer — it’s bold, graphic and full of neon colors. Neon strokes and a black line down the middle help make this style appear edgy, while the long almond-shaped nails keep it under control. You’ll love this summer nail art when you’re holding a glass of iced matcha or finding outfit inspiration on Pinterest.

To nail this (pun fully intended), I’d go with a nude base like Essie’s “Ballet Slippers” to keep the attention on those fluorescent streaks. You should pick up pink, green, purple and yellow nail polish, like the ones from Lights Lacquer’s Electric Bloom and a fine striping brush for the best results. High contrast between the accent colors and the neutral background makes them look the best.
Creating this design at home takes some time, but it’s definitely possible. To start, file and shape your nails—the biggest nails you can get will look best for this style. Apply a first layer of nude polish, let it dry and then apply another layer. Take a liner brush and draw your neon lines upwards and use a super fine brush for the black divider. If you’d like to try something bold, a matte top coat could make this look more like a runway style.
A nail artist once told me that neons are taking over as the summer color and I’ve agreed with her ever since. Even if traditional red, white and blue doesn’t appeal, neon will make sure you stand out.
![]()
Butterfly Fade and Bejeweled Fantasy
Here’s where maximalism meets midsummer magic. You’ll love the mix of pink, purple, orange and blue gradient French tips on this mani, with dreamy 3D butterflies, flowers and pearls on top. It’s a classy 4th, but seen through the eyes of someone who also loves Coachella and red carpet inspiration. The ombré gives this piece a gentle look, but the crystals and charms give it a real wow factor.

Materials-wise, you’re going to want pastel ombré gels or sponges to blend the colors — Beetles and Kiara Sky both make kits ideal for this look. Most nail gem kits on Amazon are supplied with both pearls and small rhinestones for your 3D designs. A good builder gel will support the heavier charms in your bracelet.
Fade your makeup using a sponge, starting at the ends and working your way downward. Cure between layers. After that, brush the petals onto the cake with a petal brush and white gel paint. Apply nail glue or a thick top coat to your gems and then finish with clear gel.
I did something similar for a birthday brunch and really felt like a fairy. It’s powerful to wear something that is both soft and dramatic. When Brittney Boyce said, “Your nails are jewelry you don’t take off,” I understood exactly what she meant here.
Nautical Luxe in Primary Stripes
I just love how clean, colorful and classic nautical this mani is — it’s so satisfying. With matte navy, bright red and striped nails, adding golden anchor charms, this style is perfect for any Fourth of July event on or near the water. It’s designed, elegant and clearly inspired by Western 4th and Hamptons yacht clubs.
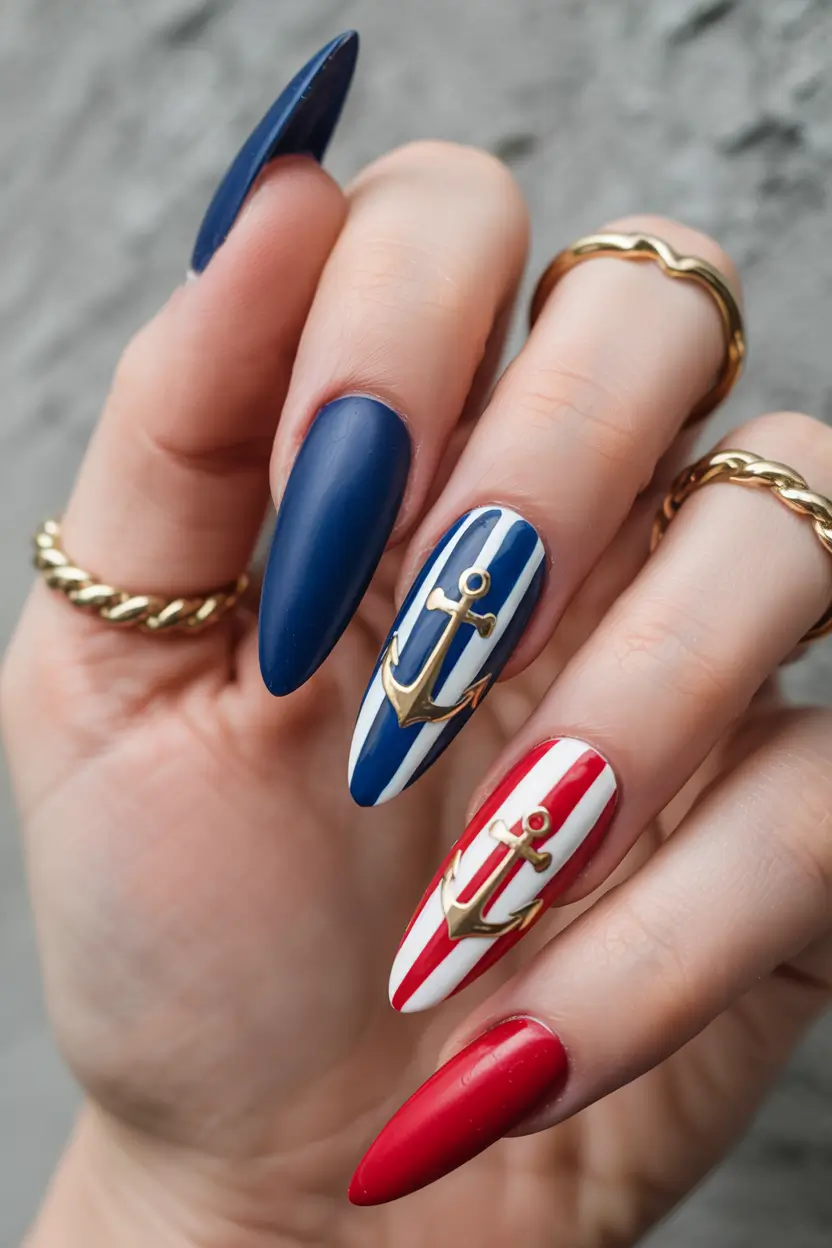
To recreate it, grab a matte top coat, navy and red gel polishes (like LeChat’s “Blue My Mind” and “Ruby Slippers”), white striping tape or a precision brush, and tiny gold charms — you can find anchor nail decals on Etsy or at craft beauty shops.
Paint the base clean and add two layers of each color and after that, use the tape or brush to make your vertical stripes. Put the anchors in place with a dot of nail glue and finish by painting over everything with a matte top coat. It takes careful work, but it’s not too hard and the result is amazing.
I love this look for how put-together it feels. It’s a nod to tradition without being boring. When you want a simple fourth nail idea that’s also stylish, this is the one for you.
Glazed Confetti Tips for Cozy Glam
A touch of sparkle always looks nice and these milky pink nails with heart-shaped confetti glitter are truly cozy and glamorous. The glittery bits reflect the light just as sunlight would on a pool and the natural base ensures the look is soft, sweet and can be worn in many ways. This one’s for you if you want a subtle fourth look that still feels like you’re celebrating — just with a wink, not a shout.
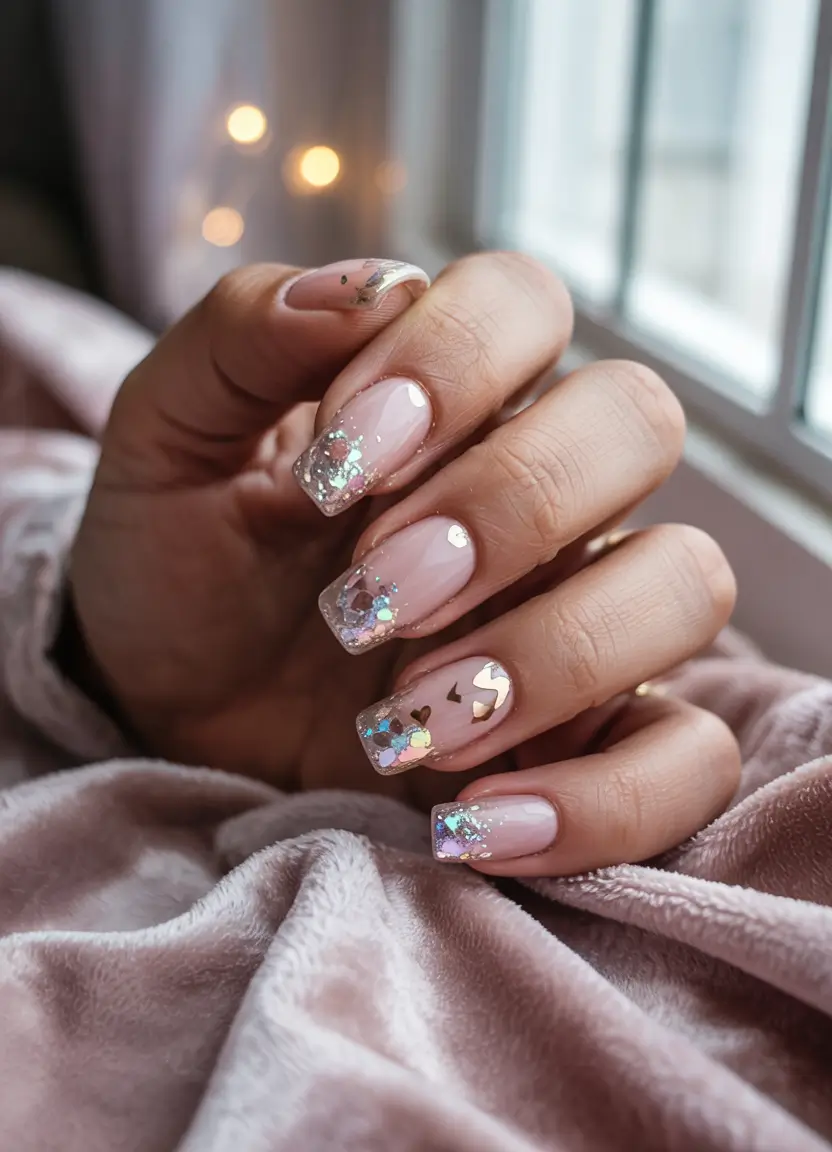
You’ll want a sheer pink polish (like Essie’s “Sheer Fantasy”) as the base and a mix of chunky glitter in hearts, hexagons, or stars. If you don’t like the process of putting on glitter by hand, Olive & June’s Confetti Top Coat is an easy way to go. If you don’t have glitter paint, use a clear polish and place the sequins with a dotting tool or toothpick.
This look is surprisingly easy fourth to DIY. If you’re trying to keep your nails simple for a trip, it works great on short fourth nails. Don’t forget to cover with a thick top coat to prevent the glitter from catching on things.
I dressed the same way during a cabin weekend last year, with cozy throws, some wine and sparkly nails that caught every light from the candles. Beauty doesn’t always have to scream; sometimes, it whispers.
Chicago Flag Meets Red, White & Playful
Fun, patriotic and a little nostalgic — the red white and blue colors in this design are transformed into a funny tribute to summertime in America. The Chicago city flag’s starburst design, dots, stripes and layered French tips inspired this manicure which looks like fireworks on your nails. If you’re looking for designs that are unique, this one has lots of character.

You’ll need a solid trio: a true red (like Zoya’s “Sooki”), bright white, and sky blue polish, plus dotting tools and nail tape. You can stamp a starburst or draw one freehand with a detail brush and if you’re not sure, you can use a stencil.
It’s best to start with the base coat, add two layers of color and then add one detail to each nail as you go. Alternate designs (dots, stripes, stars) to keep it interesting without overwhelming the look. This one’s all about the charm.
I watched this at a Fourth of July block party last year and couldn’t stop thinking about it. It felt festive, but not forced. A bit of vintage, some pop art and plenty of fun. If you enjoy designs that are simple, playful and perfectly themed, you’ll like this one.
Muted Safari with a Modern Twist
I love the combination of earthy green and giraffe print — it’s a stylish mix of safari and homey looks. The design combines soft olive colors with clean white outlines around abstract spots that are a dusty rose shade. This isn’t like most acrylic sets; it’s simple but smart, fun but put together well. It’s perfect for a western-themed 4th, where natural colors and unique touches come together.

To bring this look to life, you’ll want a matte top coat (I always reach for OPI’s Matte Top Coat), a muted green polish like Olive & June’s “WKF,” and a warm mauve such as Essie’s “Angora Cardi.” If you want the pattern to be the same, use a nail stamping plate or dotting tool.
This design is actually simpler than it looks. Start by applying your solid green nails and curing. The accent nails should be mauve; then, use a white polish with a nail art brush or dotting tool to draw the giraffe’s spots. Finish all your nails with a matte top coat, except the patterned ones, if you want some texture to show.
I prefer this easy nail look for when July is over and you still want your hands to say something about your style. Plus, it’s perfect for transitional outfits, especially linen or knits.
Lavender Sorbet and Golden Glaze
A feast for the eyes — the lavender and lime sorbet in this design is topped with delicate gold foil. Because of the combination of lilac, green and metallic shimmer, this manicure is perfect for anyone who wants a fashionable summer look. It’s luxurious without being loud, artistic without being overdone.
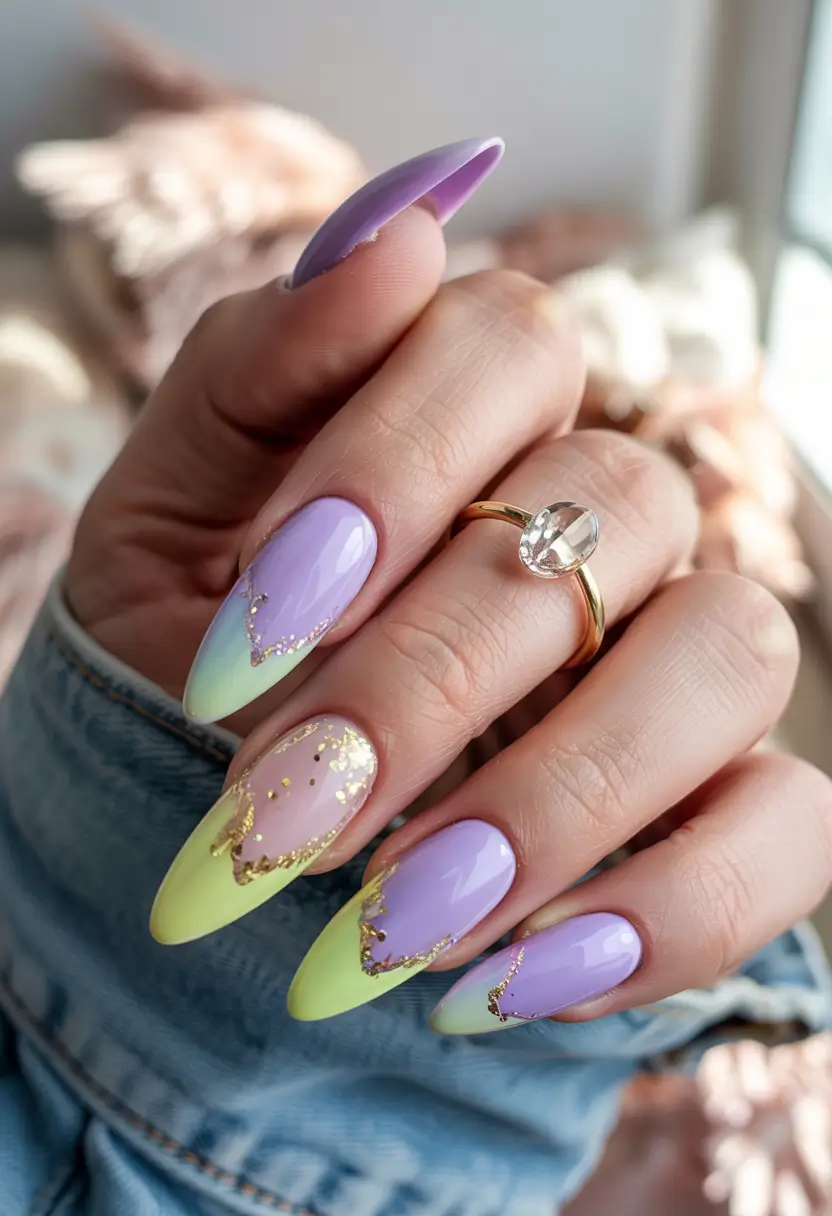
If you are using products, I recommend the “Free to Be” gel from DND for the purple base and “Limeade” from Cirque Colors. Amazon has gold foil flakes and a thin brush will allow you to place them softly along the edges of your nails.
Start by giving your nails an almond shape and then apply a strengthening base. Use colors that alternate and don’t worry too much about the shapes; they should seem natural. After the piece is cured, use tweezers or a detail brush to put your foil in place. Finish it with a clear gloss to get the jelly result.
I think of fluffy clouds and bubbly mimosas when I think of summer. This look just screams vacation — or at least pretending you’re on one while you’re typing emails with your left hand and sipping iced coffee with your right.
Frog Energy and Color Pop
Let’s give some love to the adorable frog nail. It’s giving meme energy in the best possible way. This set of alternating neon and forest greens is topped with a cartoon frog graphic on a white background, with some cheeky lettering. This mani is playful, full of fun and reminds me of a Lisa Frank design for adults. It might not look very 4th of July, but it does shout out “this is who I am.”
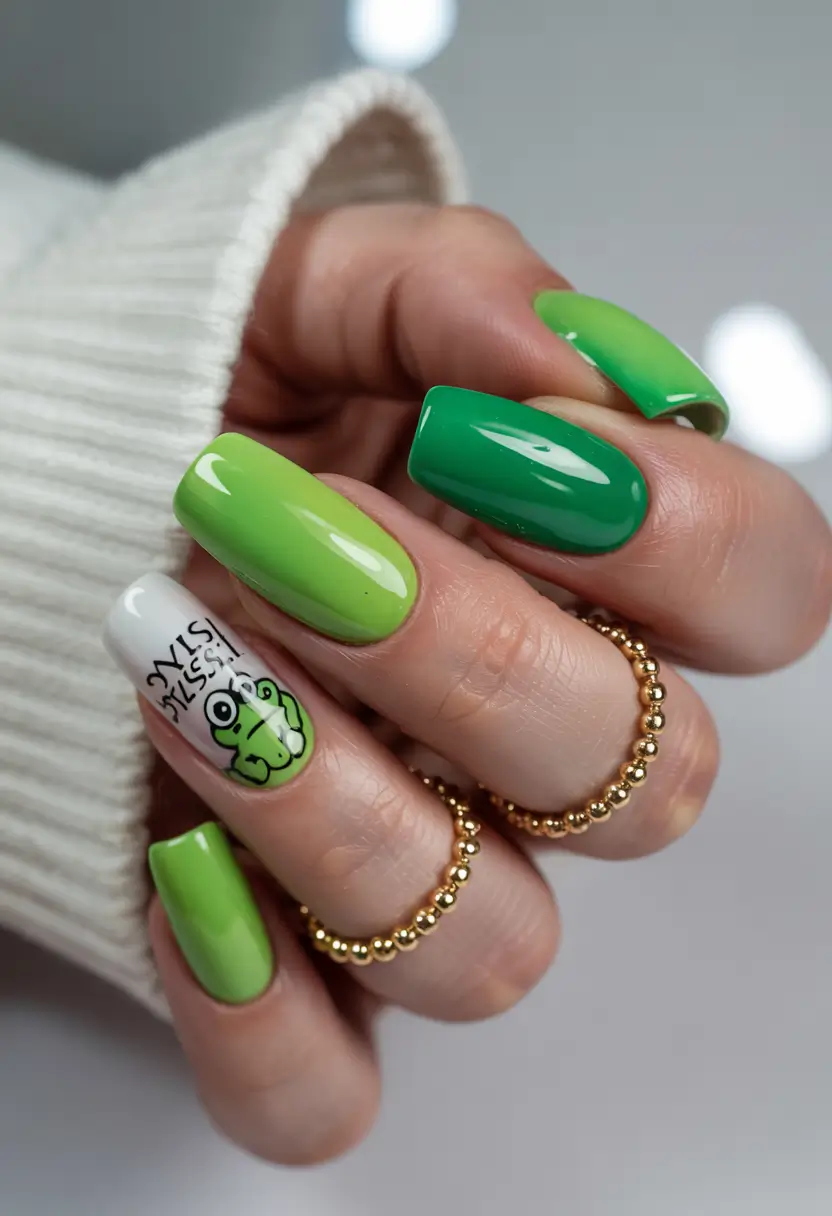
This look works best with a glossy lime color such as Orly’s “Green Scene,” and a forest green color from Essie called “Off Tropic.” You’ll need a white base for the accent nail, plus a fine detailing brush or nail decal of a frog (there are tons of options on Redbubble or Etsy).
Application-wise, this one’s relatively easy 4th level. Two layers of every color, clean lines and a striking frog on your ring finger. If you’re unsure about drawing freehand, stickers or wraps are your best friends.
I saw one of my friends rock the same look at a summer pool party and everyone loved it — they were all taking photos of her nails instead of the drinks. Sometimes joy comes in tiny green packages.
Birthday Sprinkle Magic
If you’ve always wished for your nails to look like a party, you’ll love this. Using bright pink and sprinkle details on a nude base is like having a frosted donut on your nails — it’s festive, fun and surprisingly flattering. It’s a style that’s playful yet still looks thought out. It doesn’t matter if you’re 21 or 61; this birthday mani will look great.
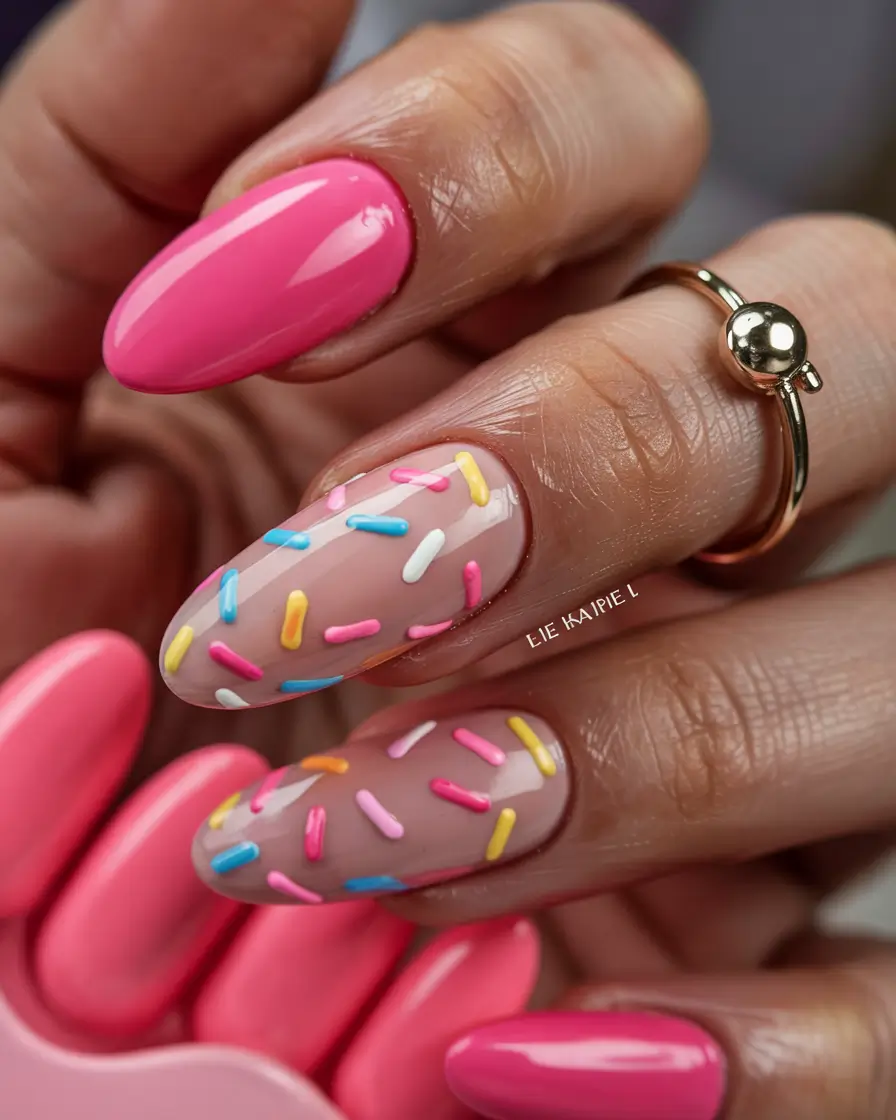
First, apply “Mademoiselle” from Essie as a sheer base and then add 3D sprinkle charms or use striping polish to get the effect. Make sure your sprinkles are pink, yellow, blue and white. A gel top coat will keep all your nails looking neat.
Apply your nude polish to the nails, cure and then use the dotting tool to place sprinkle shapes in several directions and lengths. You don’t need to be perfect; a bit of randomness makes it more appealing. Seal with a glossy coat.
I wore this to my niece’s summer party and I still felt put together, even though it’s a fun piece. There are times when letting your nails be the last thing you do is a good idea.
Abstract Color Pools
The design is a modern art look — bright, overlapping colors on a clear or nude base. Because the shapes are not perfect, the nails look lively and youthful. You’re in luck if you’re looking for a non-traditional 4th of July nod. Using red, blue and yellow gives a patriotic feel, but it’s not overly themed.
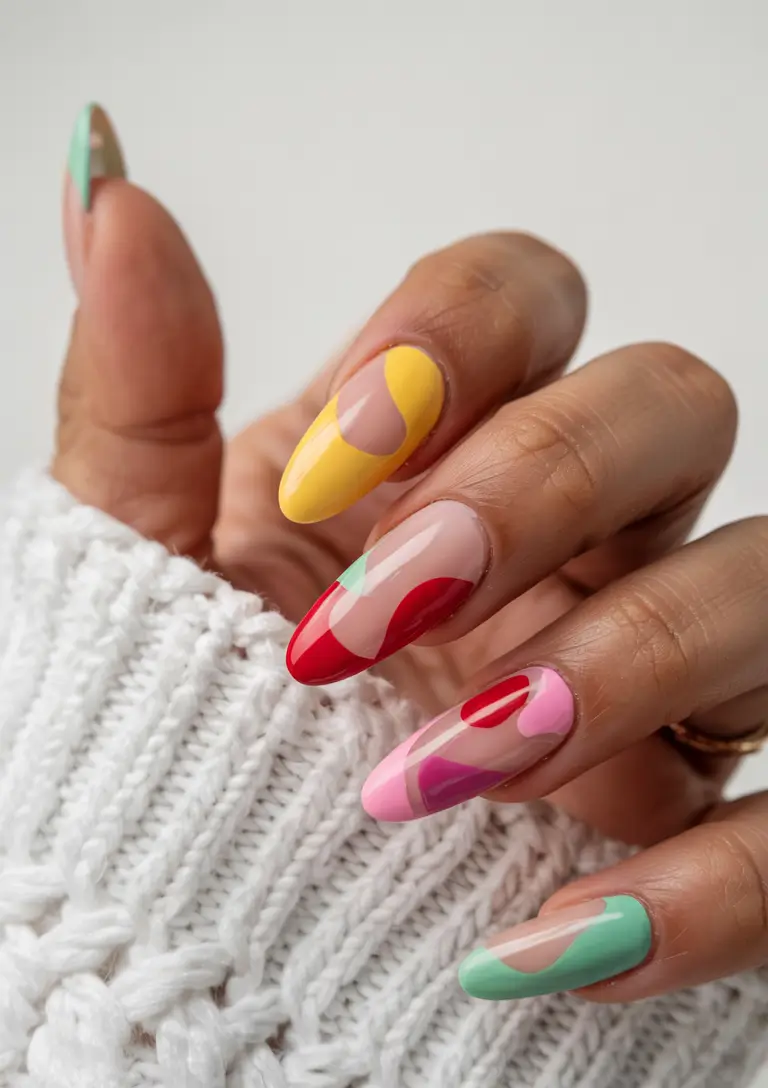
Try a semi-transparent base or sheer pink, then go in with opaque shades of red (like “Big Apple Red”), yellow (“Sunflower Yellow”), pink, mint, and blue. A little patience and a small brush will help you get great results.
First, base and cure and then apply each color shape, curing between each layer. Keep the shapes rounded and overlapping slightly. This look is super forgiving and doesn’t have to be symmetrical.
It’s a nice feeling to let your nails be fun without putting in too much effort. I think of this as the “art gallery” mani, as it’s sure to impress at brunch.
Daisy Yellow Delight
This manicure shows what summer looks like in full bloom. A combination of soft yellow, lavender and buttercup 3D florals gives a cheerful garden feel perfect for a sunny day. It’s gentle yet rich, great for people who love cottagecore but want a refined effect.

You should have Sally Hansen’s “Mellow Yellow” lemon yellow polish, a clear base and 3D floral gel or nail stickers. If you can’t find pre-made embellishments, try using builder gel and a petal mold.
Paint your nails yellow and nude, cure them and then press your floral designs onto the accent nails. Finish with a top coat for a glossy seal.
If you include some red white and blue flowers, you might see this as the 4th nod, but it’s also a nice everyday choice. I’d put this on for a picnic in a botanical garden or even when I’m doing my grocery shopping.
Olive Garden Daisy Tips
We’re finishing off this round with some quiet elegance — olive nails and white daisy details. Its almond shape, shiny look and simple design make it perfect for anyone wanting a natural and seasonal short fourth or subtle fourth mani. It’s a classic, feels grounding and matches everything you own.
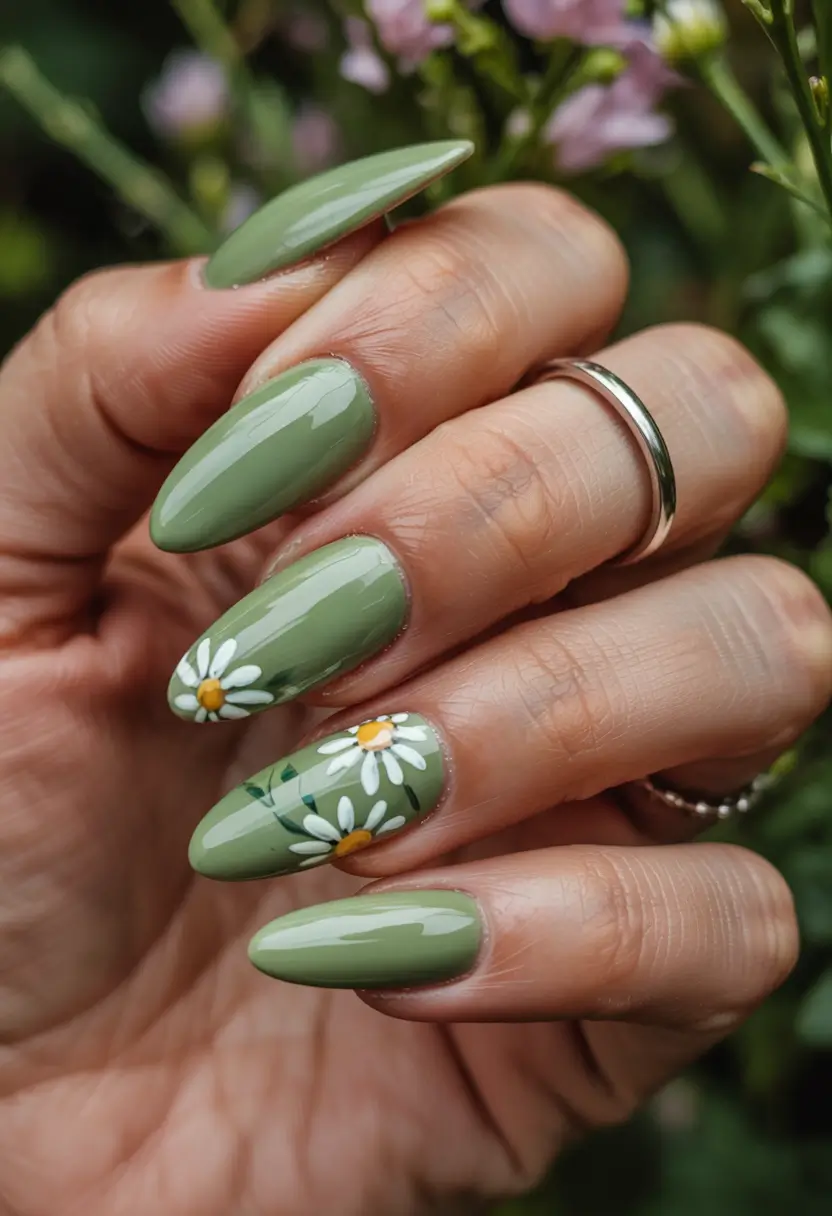
Use “Sage” by Holo Taco or Zoya’s “Bee” as the first color on your nails. Take a dotting tool and white gel paint and paint the petals around a tiny orange dot in the middle. The flowers look best when placed near the tips.
Apply two layers of sage polish and then use your detailing tools to place dots for the flowers. Apply a coat of cure to each layer and finish by coating with a clear gloss.
I chose a similar look for my Fourth of July hike and everyone loved it. It’s not flashy, but it’s still very elegant which is exactly what I hope for.
Nail designs aren’t just about polish — they’re about presence. And this July? It’s giving main character energy. No matter if you went for a patriotic manicure, a new twist on the French tip or something colorful and citrusy, make sure your nails match how you feel, not only the time of year.
I like these ideas 4th and beyond because they’re not meant for a specific season, they’re for everyone. You can choose a glamorous, soft, bold or short look and you’ll still be yourself. And the best part? All of the styles we discussed can be adjusted to fit your tastes, your weekend plans and your budget.
If you’re still not sure about your next color or set of acrylics — this is your hint: either send the picture to your nail tech, save it for later or paint them yourself with a top coat. It’s summer, it’s Fourth of and your nails should be part of the festivities.
Catch you under the fireworks.
Save Pin